Having a nice outfit paired with your designer bags and expensive shoes can best be completed by simply wearing matching accessories. Rings, bracelets, necklaces, and wristwatches are some of the accessories that can instantly add life to your daily outfit. Accessories come in all forms, patterns, and colors. You just need to choose which one suits your attire and perhaps personality as well.
Necklaces are favorite items to many because they come in different styles, shapes, and forms.
- DIY Necklace Design Ideas
- 1. Quartz Necklace
- 2. DIY Woven Chain Necklace
- 3. DIY Diamond Shaped Necklace
- 4. Stone Wrapped Necklace
- 5. Ombre Seed Bead Necklace
- 6. DIY Ombre Pistachio Necklace
- 7. Yellow DIY Statement Necklace
- 8. DIY Geometric Tile Necklace
- 9. Beautiful Feather Necklace Design
- 10. DIY Polymer Necklace
- 11. Leather Necklace Design Idea With Cut Metals
- 12. DIY Perched Harmonies Necklace
- 13. Faux Druzy Necklace
- 14. Neon Pyramid Necklace
- 15. Penny Pasta Necklace Design
- 16. DIY Hama Beads Necklace
- 17. DIY Duct Tape Necklaces
- 18. DIY Button Barrel Necklace
- 19. Fringe Necklace Idea
- 20. Button Necklace Design
Although necklaces are readily available in the market, creating your own is also possible. Similar to DIY earrings, creating your own necklace will express your personality and style. The good thing about DIY necklaces is that they are so easy to make. All you need is the creativity to come up with a good design.
Another good thing about DIY necklaces is that you can sell them or, even better, give them to your friends as a gift. There is nothing more meaningful than a personally made piece.
Let’s get started. Browse the necklace design ideas, gather the materials, and unleash the artist in you.
DIY Necklace Design Ideas
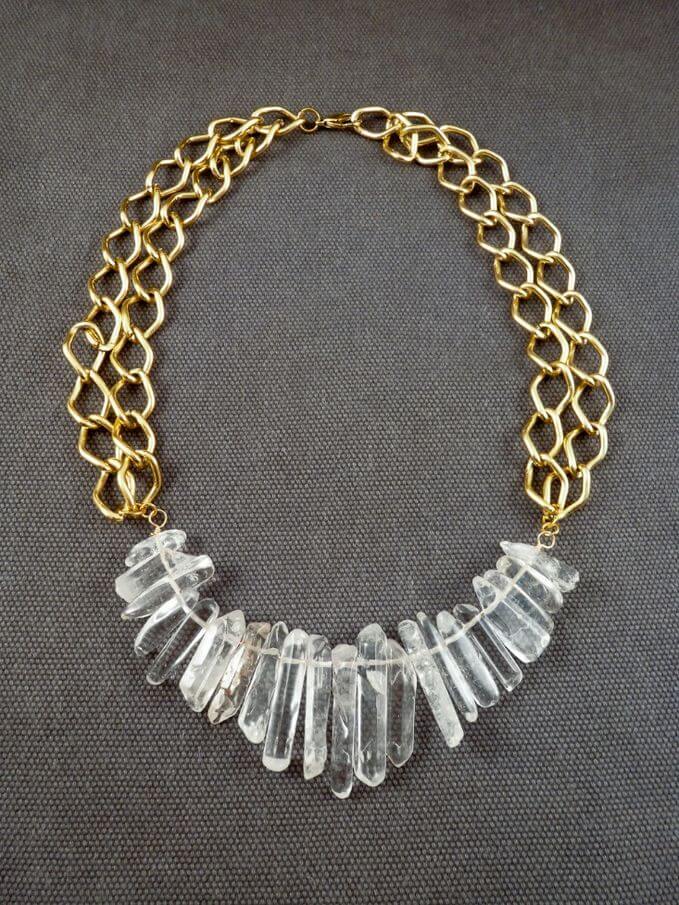
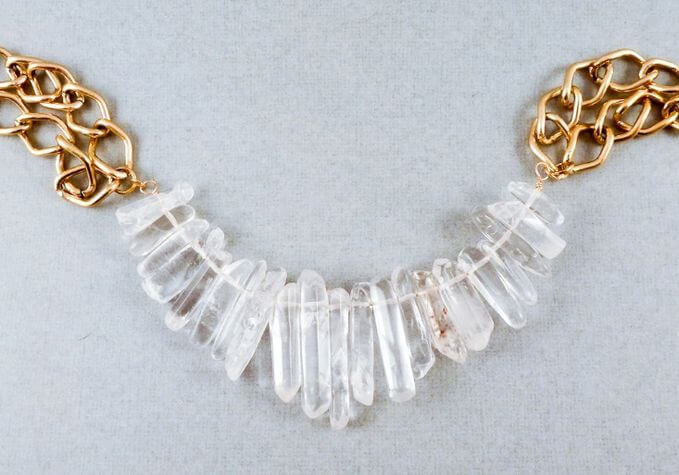
1. Quartz Necklace
Quartz and gold will help you achieve a chic look. It looks good with a tube top or other tops with a low neckline so as to highlight the quartz. You can use this necklace for work and even for formal occasions like weddings or prom.
Materials:
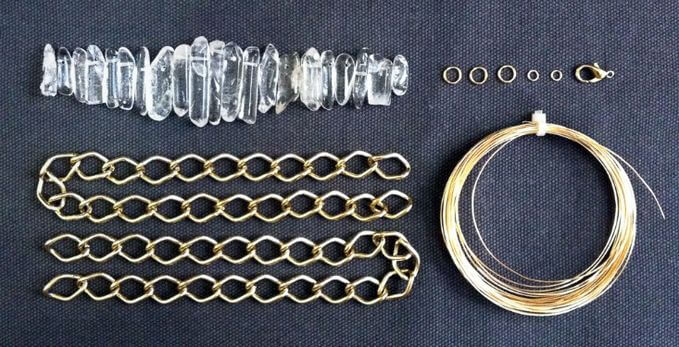
- 1 strand of quartz nugget beads
- 1 claw clasp
- small jump rings
- medium jump rings
- gold chain
- gold beading wire
Steps:
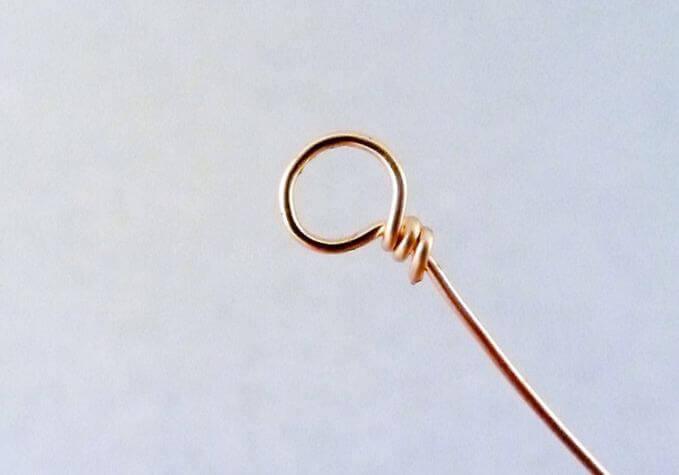
1. Cut the beading wire and make a loop on one end. This will prevent the beads from falling out from the metal wire.
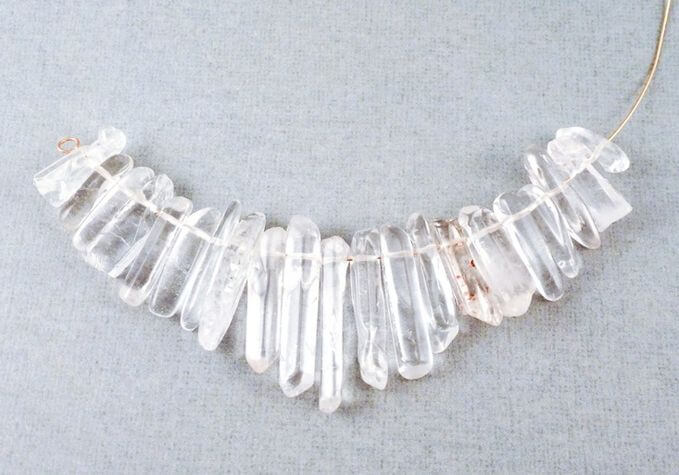
2. Insert the quartz into the wire
3. Close the other end by creating another loop that is the same size the first one that you made
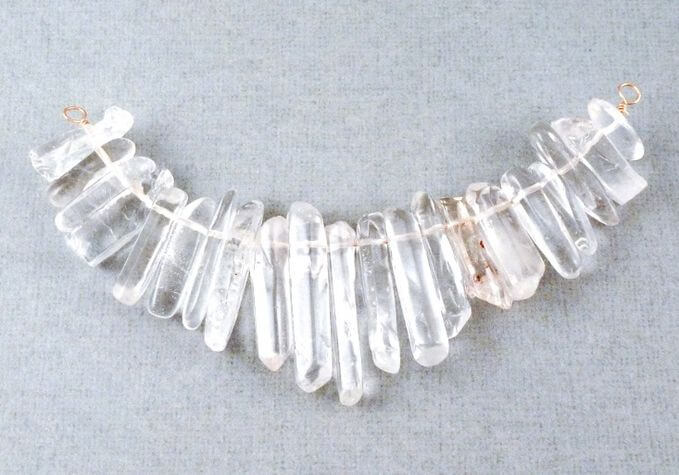
4. Attach the smaller jump ring to one end of the quartz
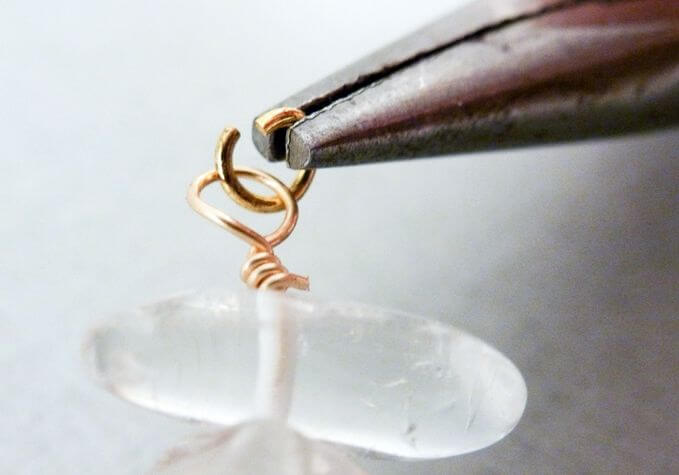
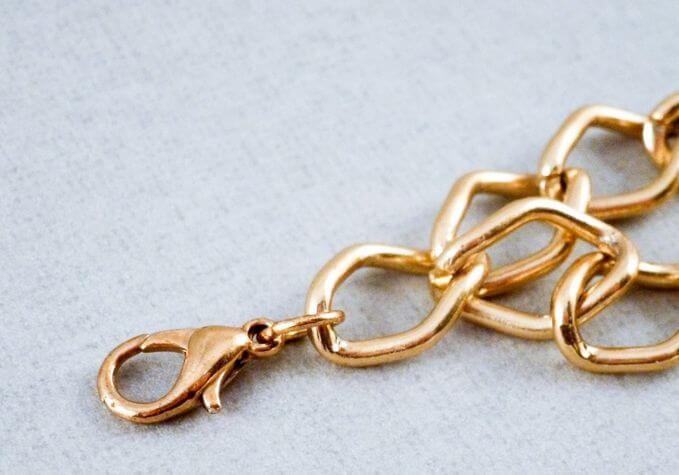
5. Use the medium jump ring to connect the smaller ring to the chain
6. Attached the medium jump ring to the lobster claw
2. DIY Woven Chain Necklace
Woven chain necklaces are fun to include in your outfit. There are so many different colors to choose from depending on your fashion taste. You can use a woven necklace over a nice dress to create a laid back look.
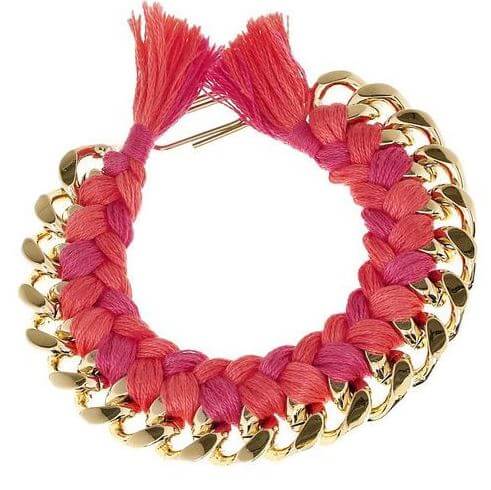
Materials:
- Gold chain in your preferred length
- Embroidery thread in your favorite color
Steps:
1. Create your thread bundles preferably 15-20 strands per bundle and should be at least 2 times the length of your chain

2. Cross the thread on the left over the right and gently pull from underneath
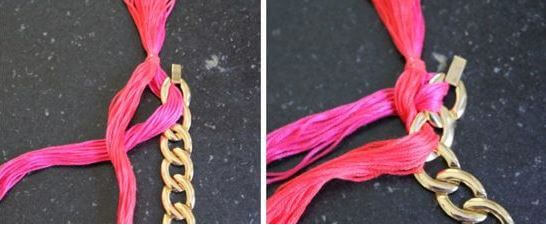
3. Continue the process until all the chains are covered
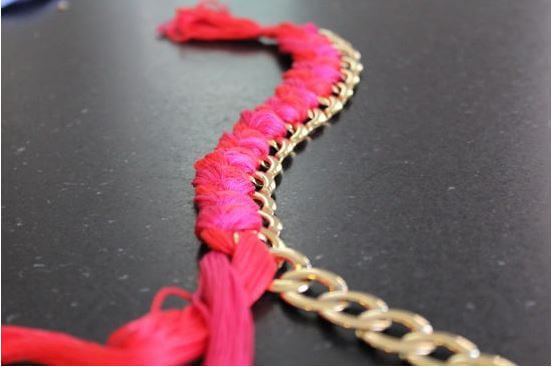
Thanks to helloglow.co
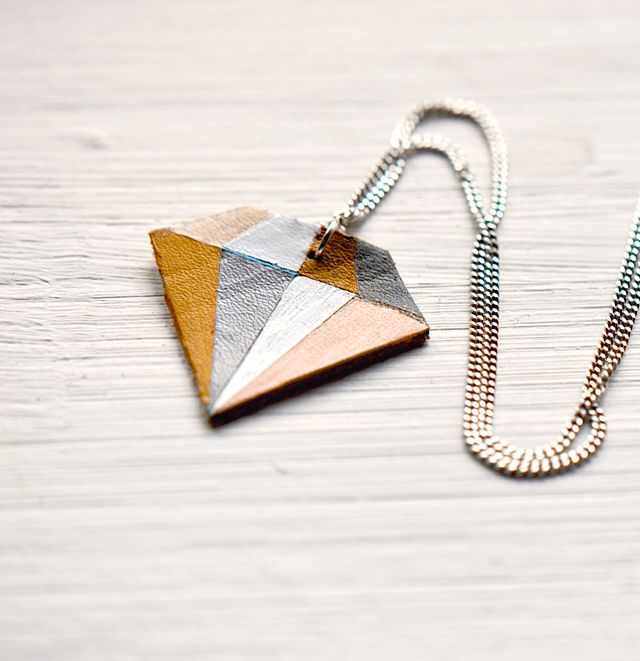
3. DIY Diamond Shaped Necklace
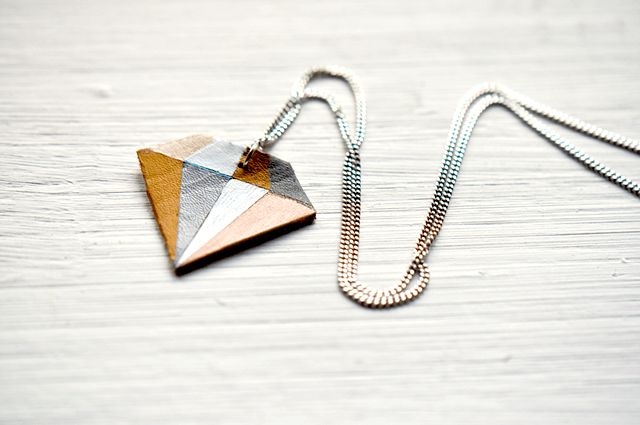
There is a saying that diamonds are a girl’s best friend. But not anyone can have the chance to have a real diamond in their lifetime. So the best way is to improvise. This necklace is recommended for teenagers and those who are young at heart. It creates a bubbly and carefree look.
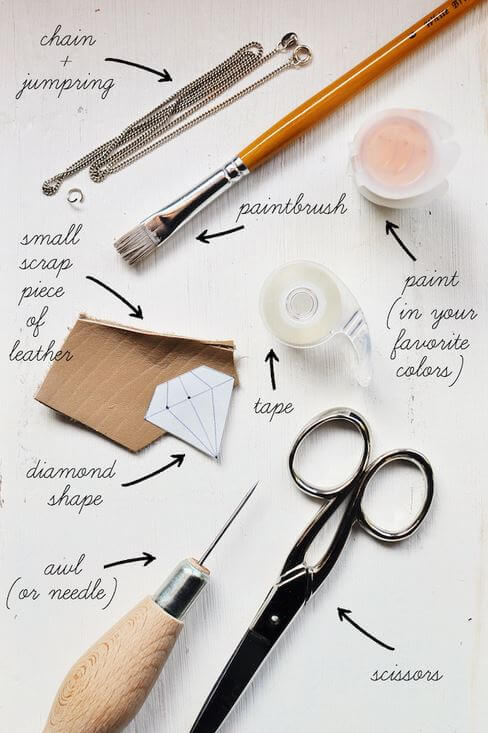
Materials:
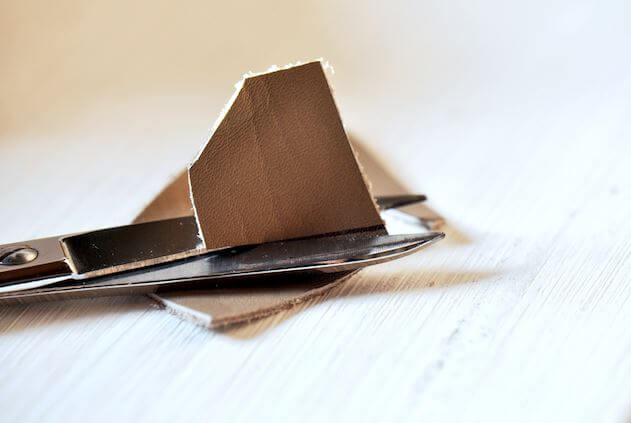
Steps:
1. Draw a diamond outline on the piece of leather and cut your design using a pair of scissors
2. Using a marker, draw the inner lines of the diamond to make it more realistic
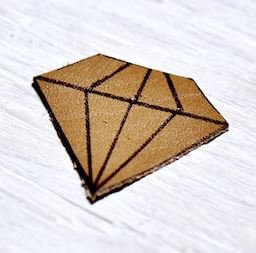
3. Cover with tape exposing one marked area at a time
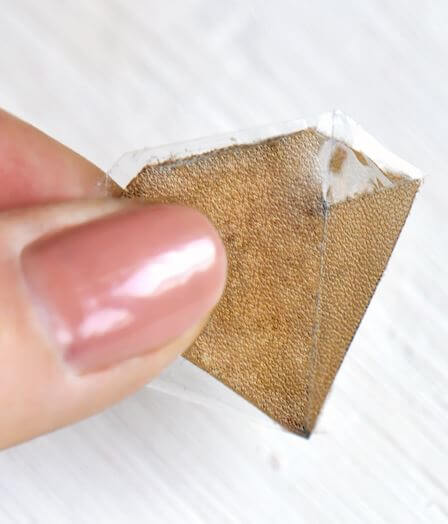
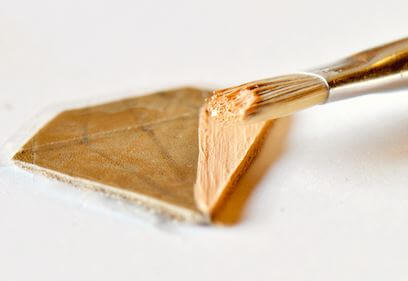
4. Paint the exposed side and allow to dry
5. Remove the tape
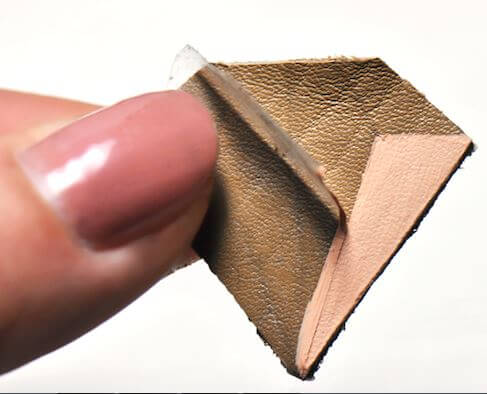
6. Paint the entire diamond and make a tiny hole on top of the diamond pendant. Use a jump ring to attach the pendant to the chain
Thanks to ohthelovelythings.com
4. Stone Wrapped Necklace
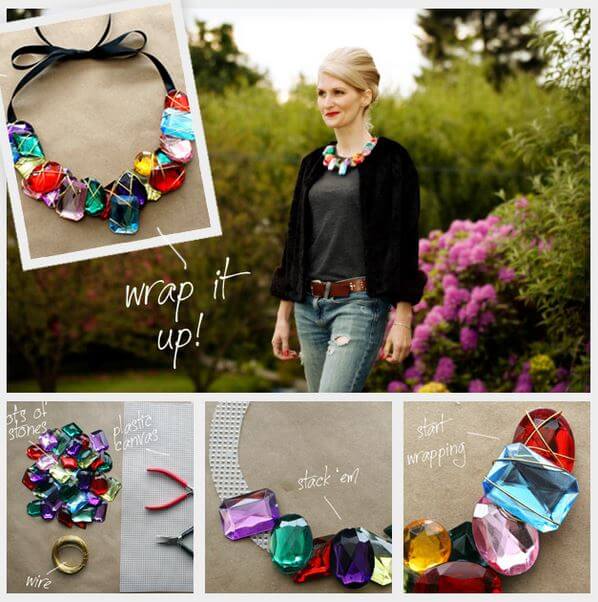
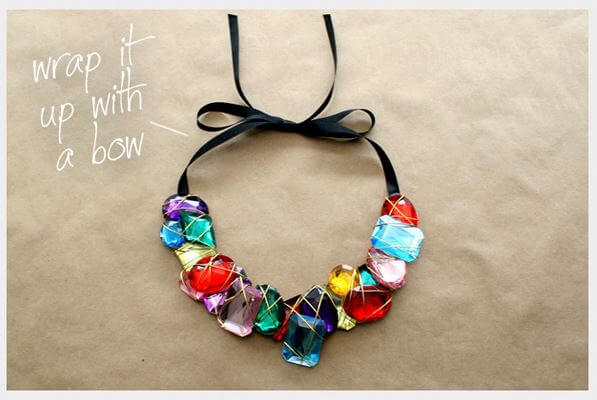
Using fancy stones for your necklace creates a fun and interesting personality. It is best to use over a plain shirt or blouse because the gems alone a fashion statement on its own. Stay away from printed materials because doing so will overdo your look.
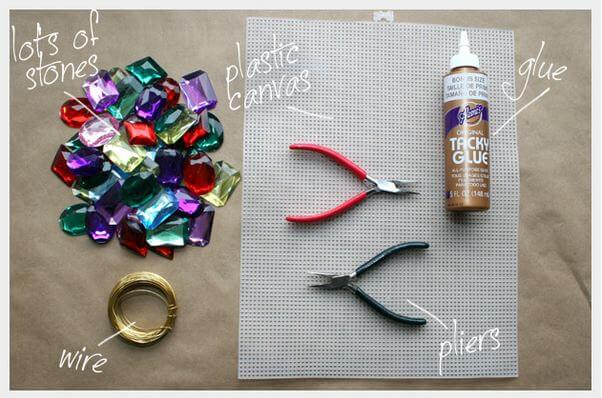
Materials:
Steps:
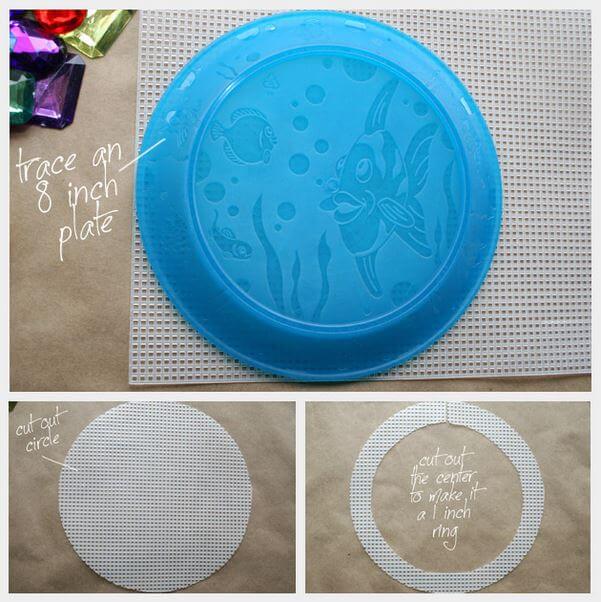
1. Use an 8 inch plastic plate to make a perfect circle outline. Cut out the circle and cut out the center
2. Glue your stones to the canvas until you have filled up half of the circle
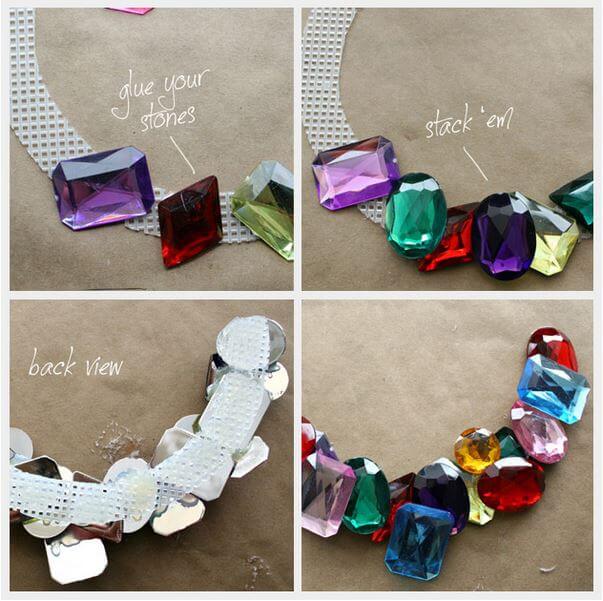
3. Wrap the metal wire around the stones. Continue until the whole thing have been wrapped up
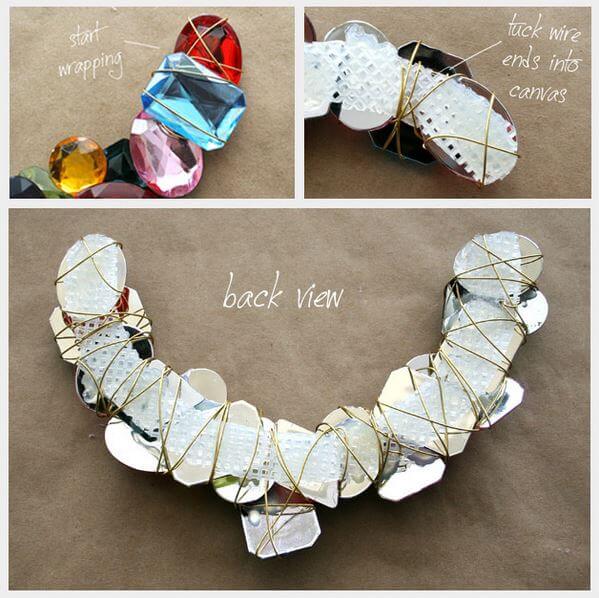
4. Cut the ribbon into 2 equal parts and attach each ribbon at the back your wrapped necklace
Thanks to trinketsinbloom.com
5. Ombre Seed Bead Necklace
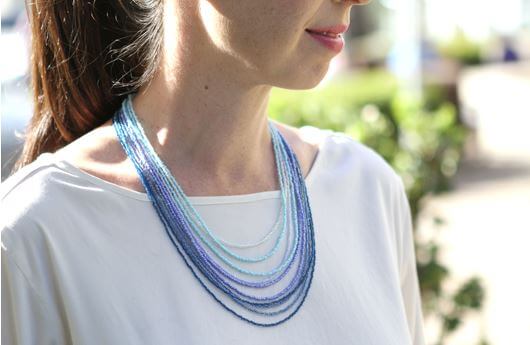
There are some necklace design ideas that you just need to get the concept, and everything else is your imagination. This example is just that!
Beads are one of the accessories that have been used for so many years now. It is inexpensive and readily available on the market. Bead necklaces can be used over a plain blouse or shirt especially if you are using colorful beads. It makes you look fresh and young.
Materials:
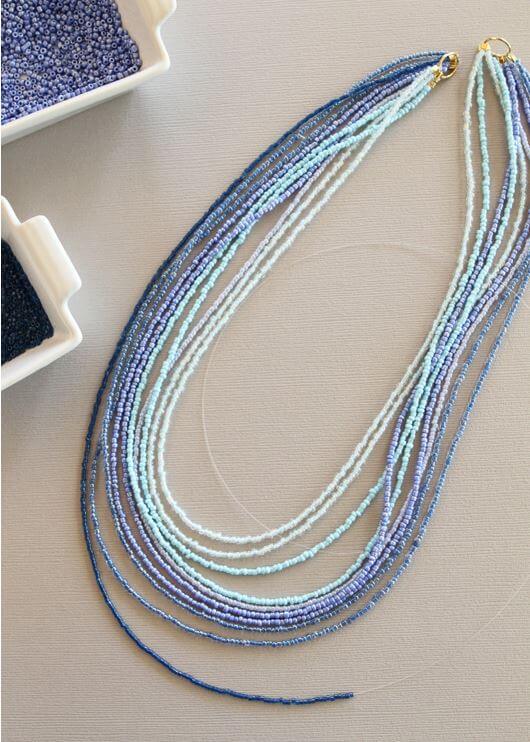
- Beads in light to dark shade
- Nylon string
- Jump rings in different sizes
Steps:
1. Cut the nylon about 20 inches long
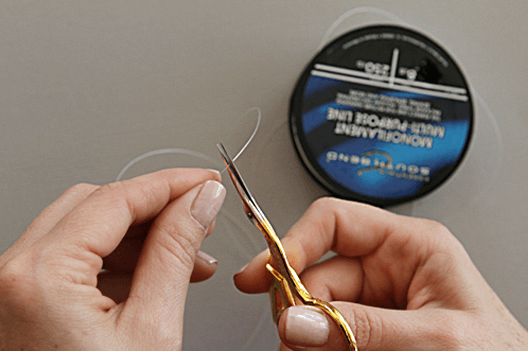
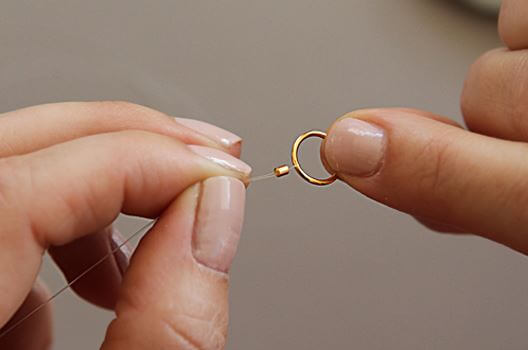
2. Add the crimp bead and the jump ring. Loop the string over the jump ring.
3. Start stringing the beads starting from light colored to dark colored one. Make as many layers as you want
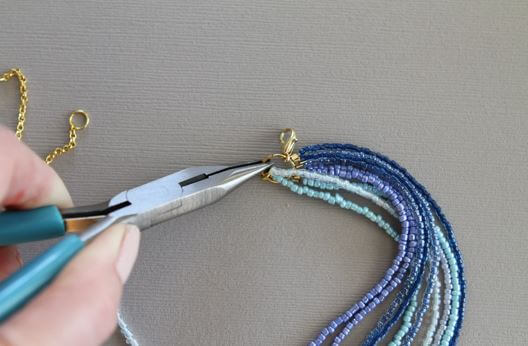
4. Use the smallest jump ring to attach the chain to one side of the necklace. Use the medium jump ring to the small piece of chain. Attach the lobster claw on the other end.
6. DIY Ombre Pistachio Necklace
Pistachio nuts are delicious! What’s good about it is you can convert the shells into a unique necklace. You can use it over a dress for that a-walk-in-the-park peg. This necklace looks very creative and is environment-friendly as well.
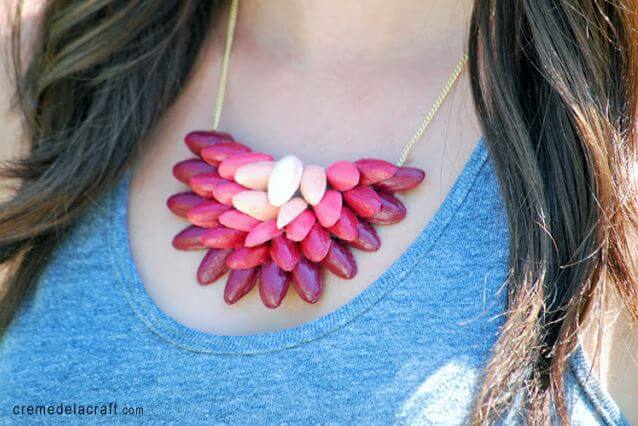
Materials:
- Cleaned Pistachio shells
- A piece of cardboard
- Glue gun
- Acrylic paint in any color
- Mod Podge
- Brush
- Chain
- Jump rings and lobster clasp
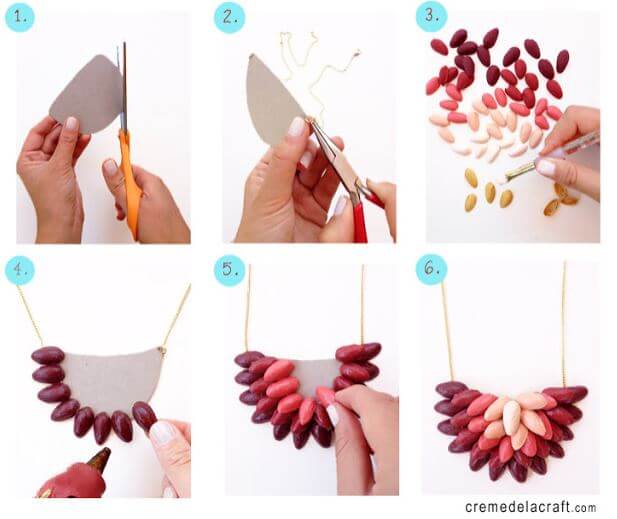
Steps:
- Cut the cardboard into a semi-circle that would act as the base of your necklace
- Attach the jump rings at the corners of the cut cardboard
- Start painting the Pistachio shells. To create an Ombre look, make sure to include light and dark colors
- Once completely dry apply a thin coat of decoupage medium to seal the paint and provide extra shine
- Using your glue gun, put the Pistachio shells in the cardboard
Thanks to cremedelacraft.com
7. Yellow DIY Statement Necklace
Using beads and safety pins as a necklace pendant is a creative and unique idea. You can play with different bead colors to unleash the creativity in you. You can wear it over a plain top paired with a long bohemian-inspired skirt.
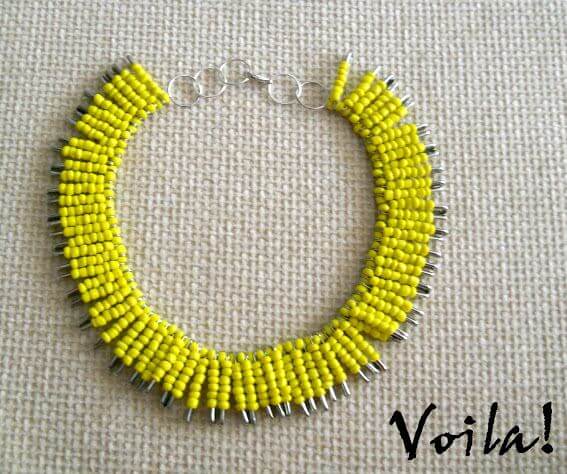
Materials:
- Beads in any color
- Safety pins
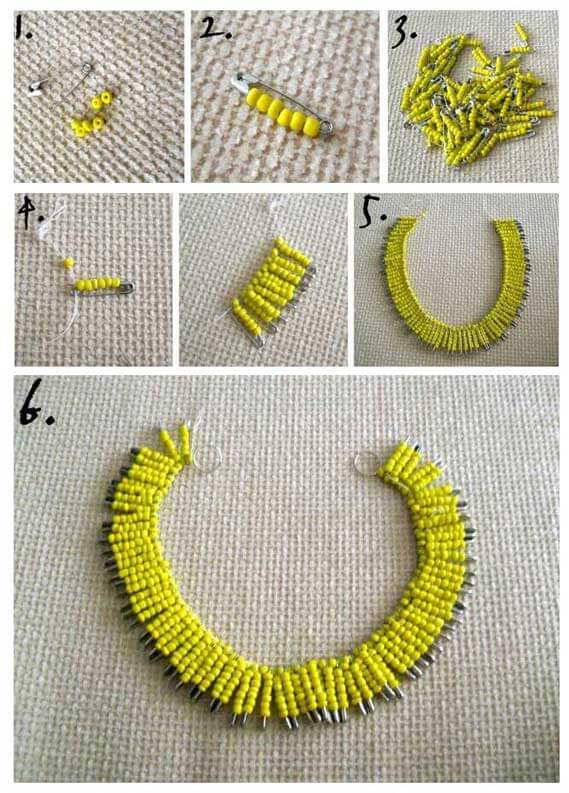
Steps:
- Prepare your beads and safety pins
- Thread the beads into your safety pin. Continue threading until you have enough to create a necklace
- Prepare your thread and insert it into the hole of every safety pin
- Continue threading
- Use jump strings on both ends and continue to add jump rings until the ends of the necklace meets
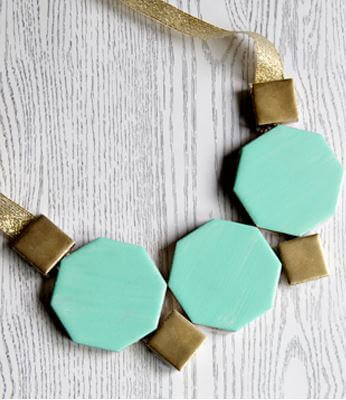
8. DIY Geometric Tile Necklace
Colorful necklaces in different shapes can best be worn over a plain top or dress with minimal details. Vibrant colors can also symbolize a bubbly and interesting personality. Always choose colors that match your personality.
Materials:
- 12″x 12″ ceramic octagon shaped tiles
- 9″x11″ stiff white felt
- Gold paint pen
- Sponge
- Black marker
- Ribbon
- Hot glue
- Acrylic paint
- Scissors
Steps:
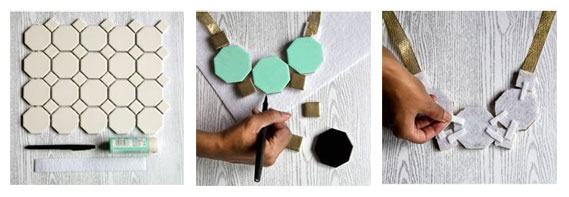
- Cut three big octagon tiles and four small diamond tiles. Use Acrylic paint to color the tiles. Attached the tiles to the decorative ribbon. Alternate the diamond and hexagon tiles until all three hexagons and four diamonds are placed in the ribbon
- Arrange the tiles on top of the stiff felt and make an outline using the marker and cut the prepared outline.
- Glue the tiles to the outlined felt and trim any excess felt
9. Beautiful Feather Necklace Design
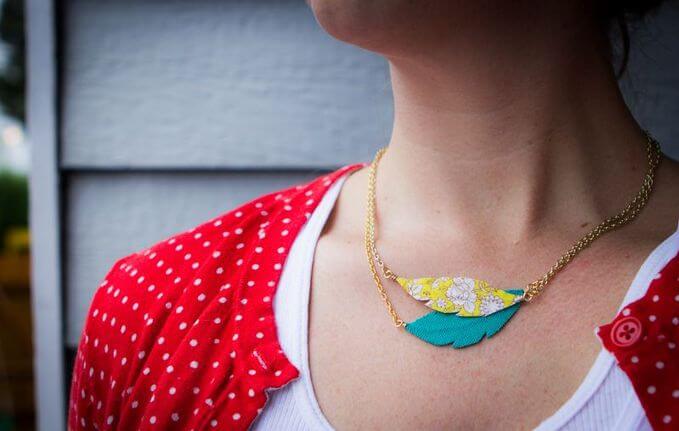
Feather pendants look very classy. Wearing one can easily create a vintage inspired look. Feathers, when wrap with colorful fabric scraps can create a more youthful outfit. This can best be worn over your favorite tank top and a colorful cardigan. It easily creates a sweet and demure image.
Materials:
- Fabric scraps
- Spray adhesive
- Feather template
- Wire
- Necklace chain
- Scissors
- Jump rings and clasp
Steps:
- Lay the feather template in the fabric scraps
- Use your spray adhesive to cover the feather with the scraps and cut any excess fabrics
- Attach your jump rings on both ends of the feather and attached it to the chain. Use the clasp at one end of the chain and another jump ring on the other end.

10. DIY Polymer Necklace
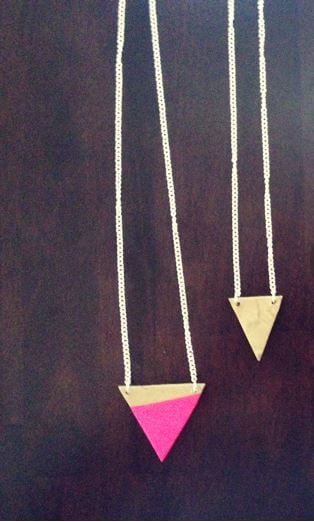
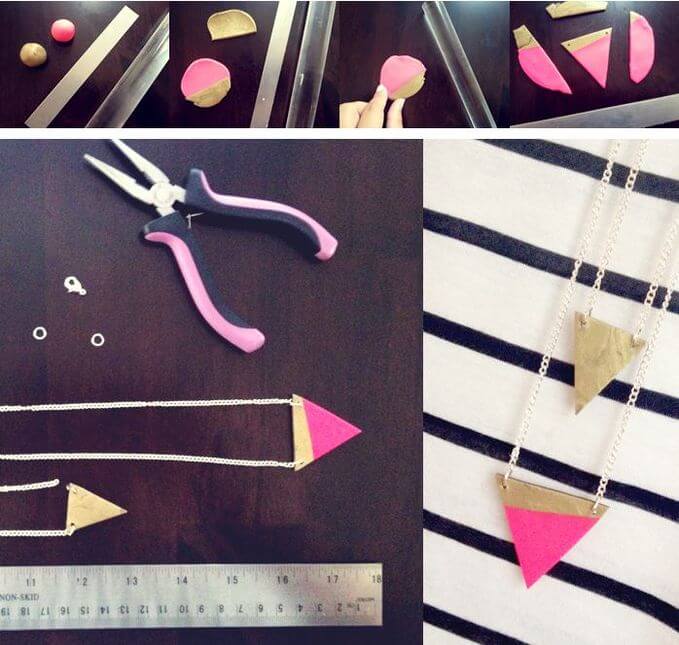
What’s good about polymer clay is you can mold it in different shapes and you can even mix it with other colors. Wear it over a tube or tank top to create an adventurous personality.
Materials:
- Polymer clay in 2 different colors
- Necklace chain
- Jewelry pliers
- Jump rings and clasp
- Roller
- Razor
- Toothpick or needle
Steps:
- Roll the clay in between your hands until soft.
- Place one color of Polymer clay over the other color. Pinch or kneed the clay until the colors have combined and they look like just one piece of clay.
- Shaped the clay into triangles until you achieve the desired thickness. Use a toothpick or a needle to create a hole on both ends of the triangle.
- Attached the jump string on each hole and attach it to the chain.
- You may also create a triangle using just one color of polymer clay.
11. Leather Necklace Design Idea With Cut Metals
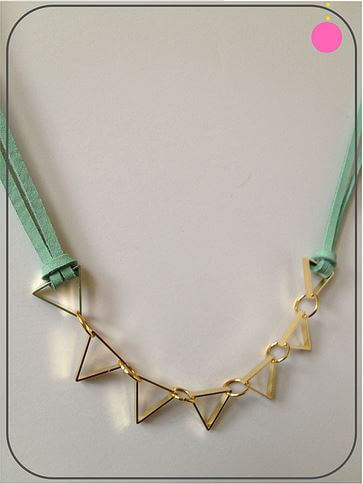
Using leather chains create a sophisticated look. You can choose any shape of metal as your pendant. This necklace would look good with smart casual attire.
Materials:
- Leather laces in any color
- Cut metals in your preferred shape
- Jump rings
- Jewelry pliers
Steps:
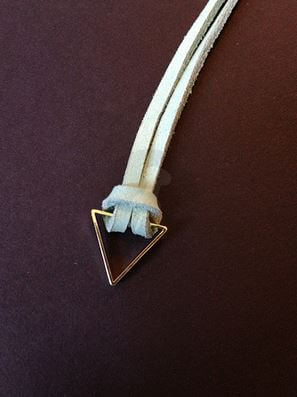
1. Create a girth hitch knot by passing the folded end of the leather lace through your cut metal shape and thread the other end of the leather lace through the loop and tighten it.
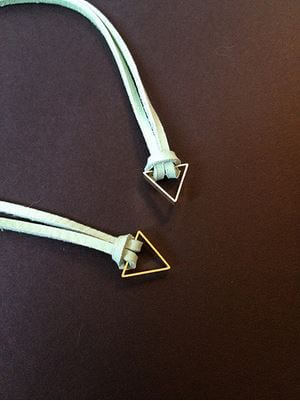
2. Do the same girth hitch know on the other end of the lace.
3. Join the metals cuts using jump rings.
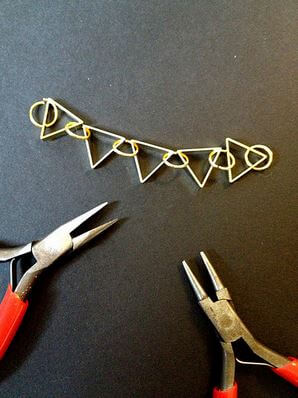
4. Attached the jump ring to the string of metals you have created earlier.
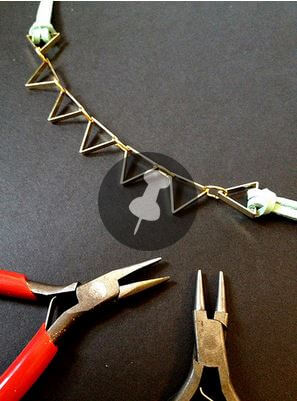
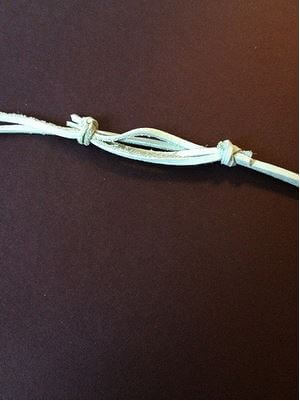
5. Close the necklace by tying each pair of lace to the other pair using an overhand knot.
12. DIY Perched Harmonies Necklace
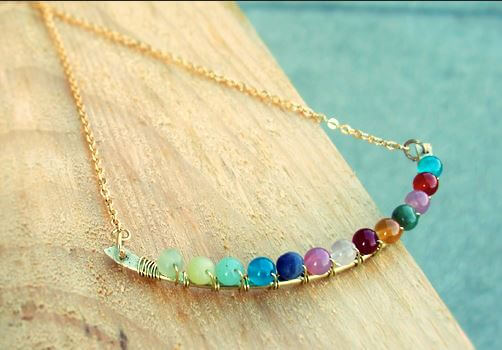
A simple DIY that is also inexpensive. This colorful necklace would look good with almost everything. Wear it on your plain tees, Sunday dress or even your office uniform.
Materials:
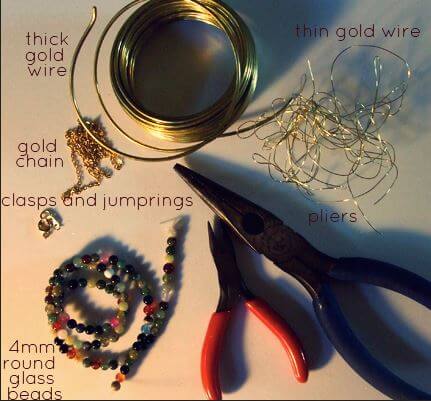
Steps:
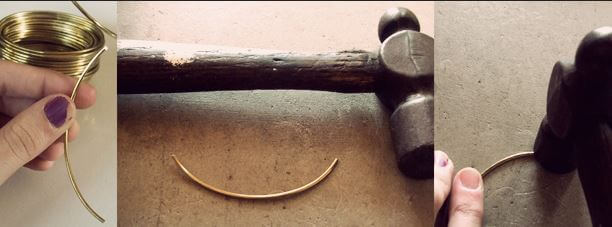
1. Cut at least 3 inches from the thick wire. Hold one end of the wire and hammer it down until it is flat.
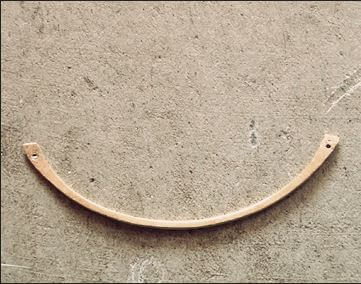
2. Make a hole on bothe ends of the hammered wire using an ice pick or anything with sharp ends.
3. String the beads using the thin wire. Wrap the end around one end of the hammered wire a couple of time until it is secure.
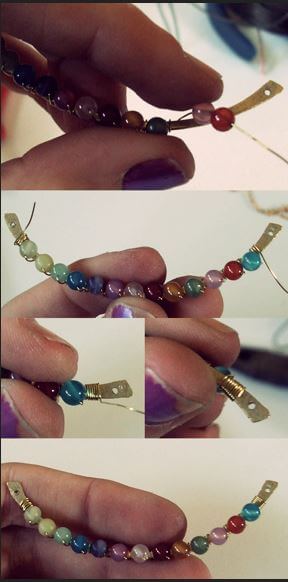
4. Attached the jump rings to both ends of the pendant and attach to the chain.
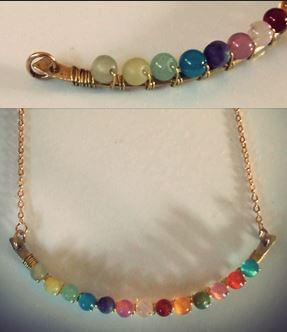
Thanks to quietlioncreations.com
13. Faux Druzy Necklace
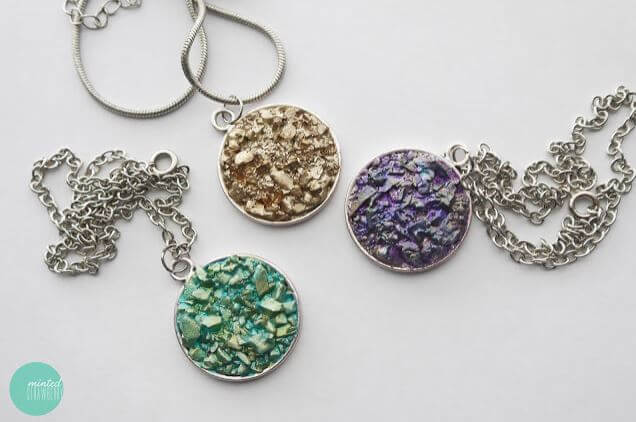
This necklace looks very organic and would look beautiful over clothing with very minimal designs. If your goal is to make a plain outfit stand out, then this is the perfect DIY necklace for you.
Materials:
- Glass
- Pendant tray
- Hammer
- Mod podge
- Nail polish
- Sponge
- Nail polish remover
- q-Tips
- Necklace chain
Steps:
1. Use the hammer to pound the glass. You may put the glass in Ziploc plastic bags to prevent injuries and to keep the hammered glass n place as well.
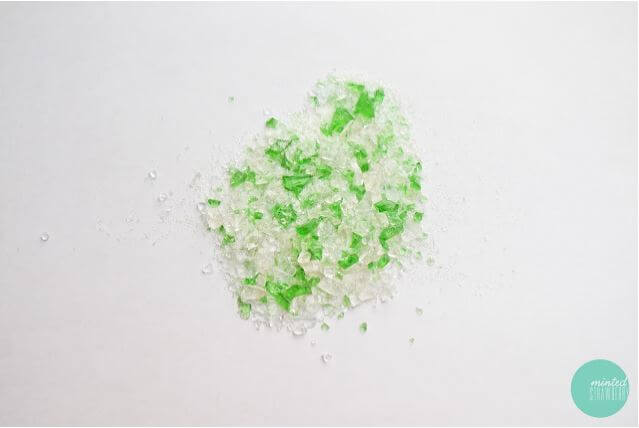
2. Put the hammered glass in the pendant tray and pour a layer of mod podge.Make sure to cover all the spaces. Let it dry
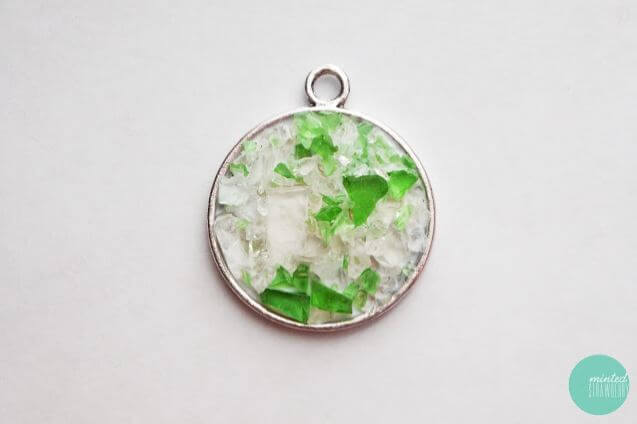
3. After it is completely dry, you can add another layer
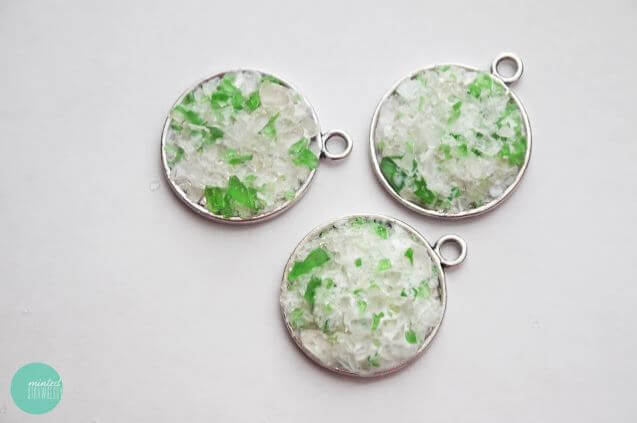
4. Use a metallic base nail polish to paint the pendant
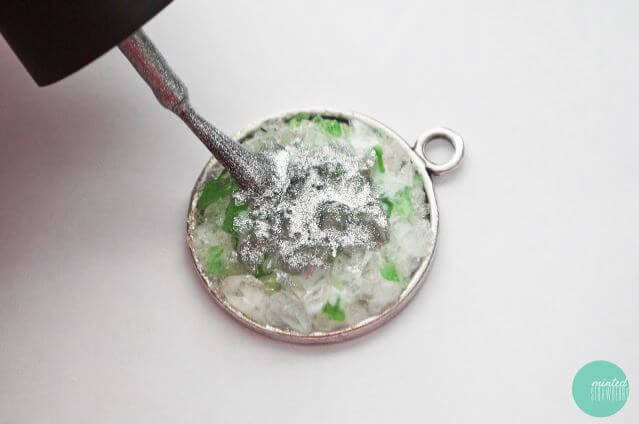
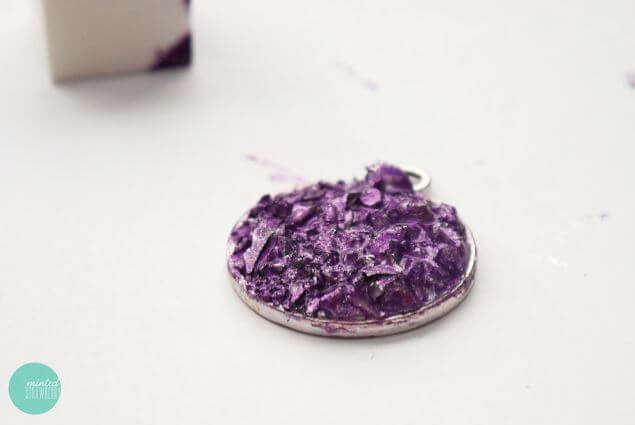
5. Now use your main color to paint the pendant and use your sponge to wipe off any excess paint
6. Use the jump ring to connect the pendant to the chain
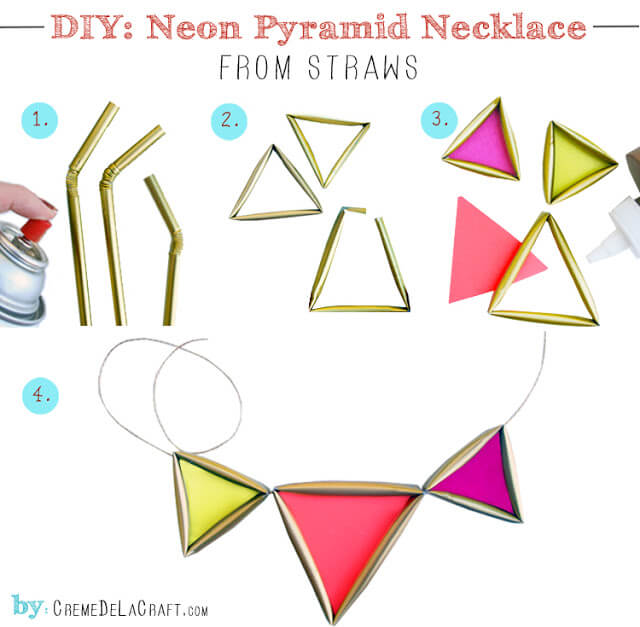
14. Neon Pyramid Necklace
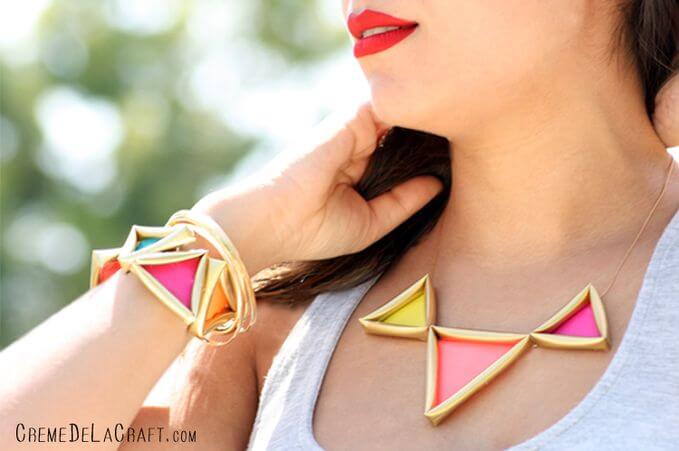
Using straw as one of the materials of your pendant is a good way to recycle and save the environment. Plastic straws may look cheap and spraying it with a gold paint can make it look classy. It would look best with your plain tank top or loose shirt.
Materials:
- 3 straws
- Gold paint
- Colorful papers
- Glue
- Needle & thread
Steps:
- Spray the straw using the gold paint
- Form the straw into triangles
- Attach the colorful paper to the triangles using the glue
- Connect the triangles using needle and thread
Thanks to cremedelacraft.com
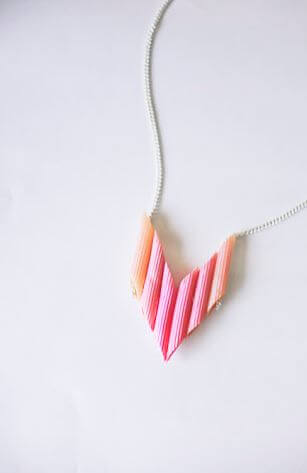
15. Penny Pasta Necklace Design
Using penny pasta as your pendant is a good way to show your creative and unique personality. Paint it with pastel colors to create a feminine look.
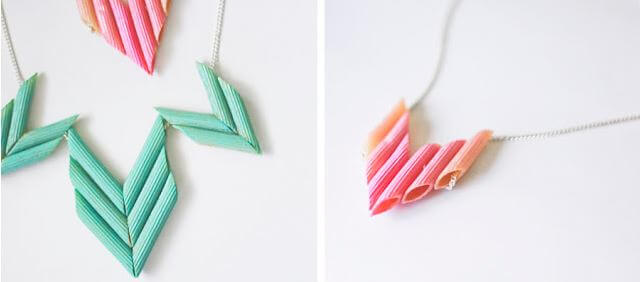
Materials:
- Dry Penne pasta
- Nail polish
- Glue gun
- Necklace chain
Steps:
- Get 6 pieces of Penne pasta and use your favorite nail color to paint it. Allow drying
- Form 3-V shapes that sit on top of each other and connect the pasta using your glue gun
- Attached the chain on the outer V-shaped pasta
16. DIY Hama Beads Necklace
This colorful necklace reminds me of Lego pieces. It is very colorful and is perfect for those who are adventurous and is up for any challenges. Use it over plain blouses so that it stands out.
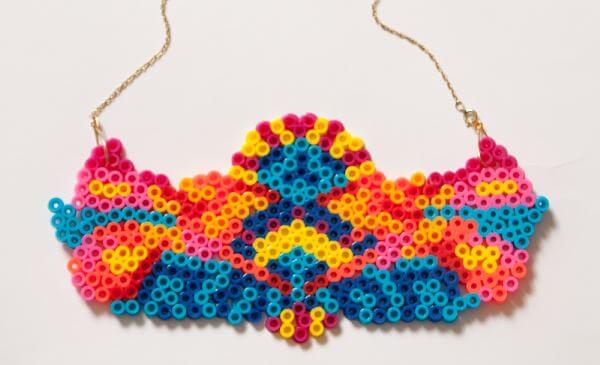
Materials:
- Watercolor
- Hama beads
- Iron
- White paper
- Metal wire
- Jewelry pliers
- Jump rings and clasp
Steps:
- Draw a pattern for your pendant using the watercolor
- Fill the pattern with Hama beads
- Continue until you finished covering the entire pattern
- Put a white paper on top of the Hama beads and iron quickly
- Using the metal rings, make a loop on both ends
- Use the jump rings to connect the Hama beads pendant to the chain
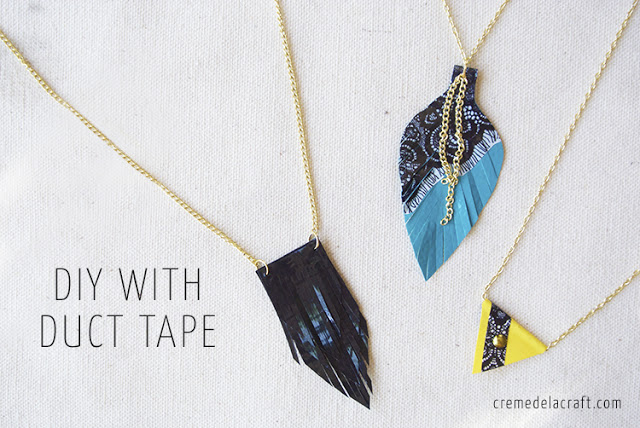
17. DIY Duct Tape Necklaces
Using duct tapes as pendants is a great way to show your funky side. Pair it with a gold necklace chain to add a classy look.
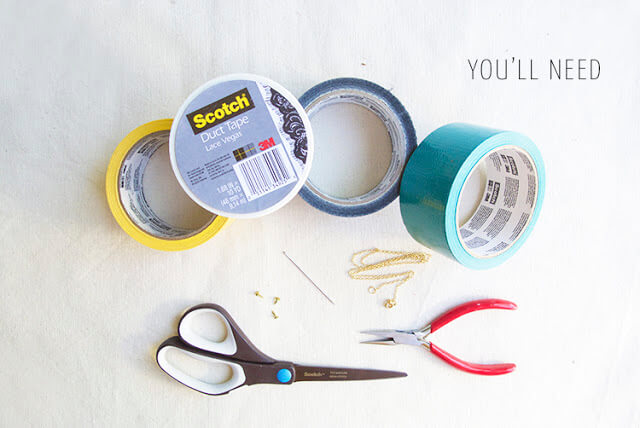
Materials:
- Duct tapes in different colors
- Chain necklace
- Needle nose pliers
- Scissors
- Needle
- Jump rings and clasp
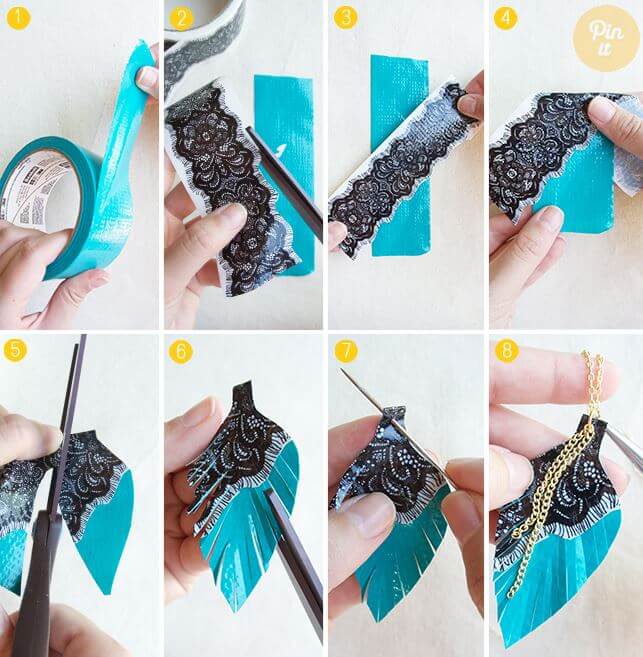
Steps:
- Trim the edges
- Get another color or design duct tape and place it diagonally on the first duct tape
- Fold the first duct tape ensuring that no bubble have been formed
- Make a leaf design and cut it (you can create any design that you want)
- Make a fringe design on the leaf pendant
- Make a hole on top of the leaf and use the jump string to attach the pendant to the necklace
Thanks to cremedelacraft.com
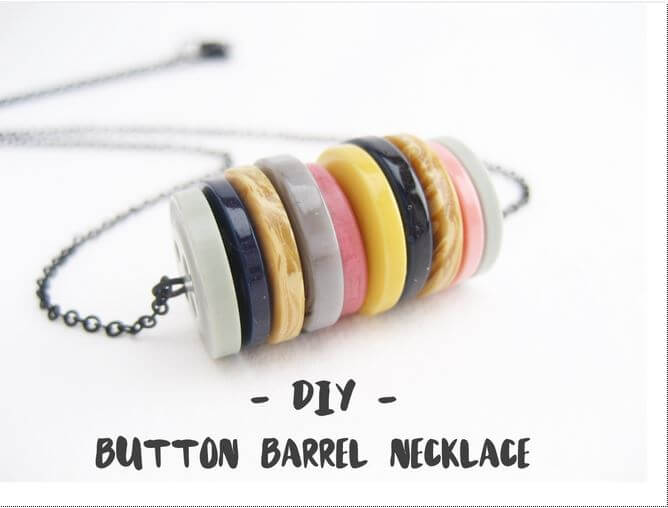
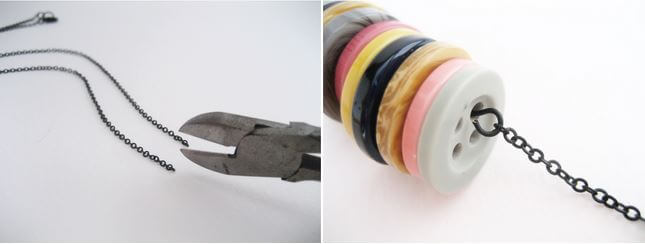
18. DIY Button Barrel Necklace
Using buttons of different colors would make a cute DIY necklace. Wearing this necklace would bring out the youth and innocence in you. It represents a carefree but interesting personality.
This will look good with plain t-shirts since the pendant is already colorful.
Materials:
- Different buttons
- Necklace chain
- Metal wire
Steps:
1. Prepare your buttons and the metal wire
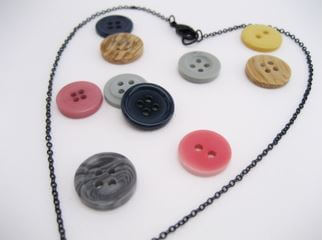
2. Using your pliers, bend one end to create a loop
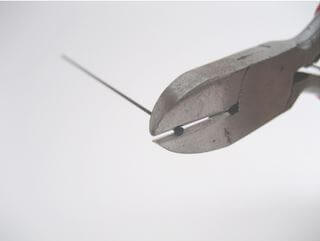
3. String all your buttons into the metal wire in order of your preference
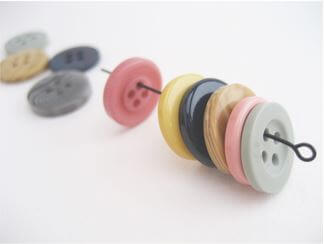
4. Make another loop at the other end to keep the buttons from falling
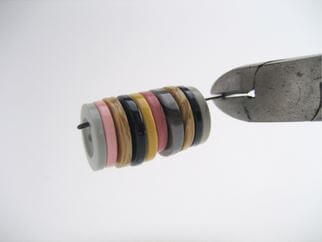
5. Connect the ends of the necklace on each eye hole that you have created
19. Fringe Necklace Idea
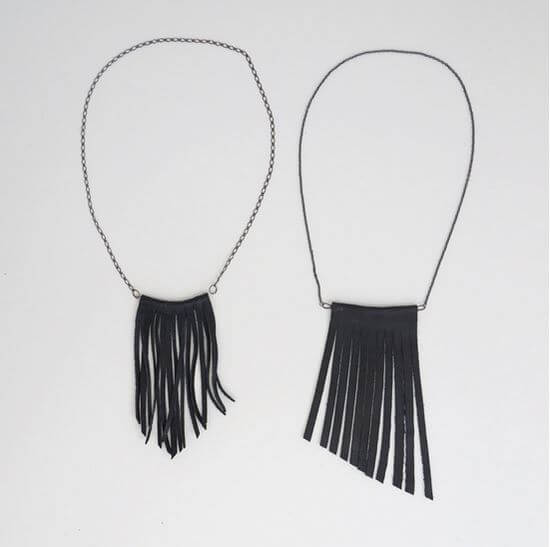
Fringe accessories are all part of the 70’s fashion. If you were not born during this time, then now is the best time to try wearing a fringe necklace. A casual outfit will look all dress up by just using a fringe DIY necklace.
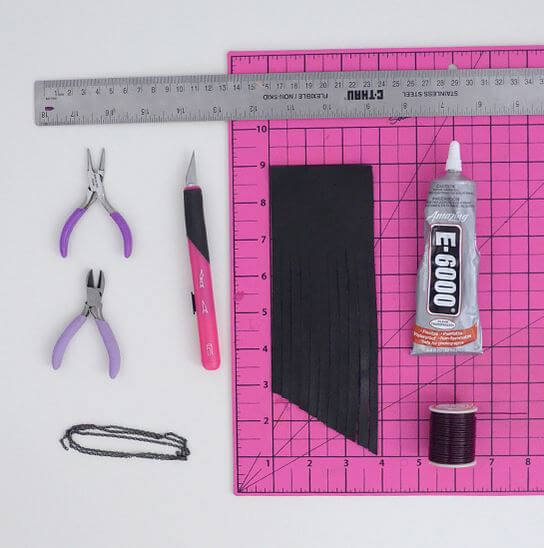
Materials:
- Ruler
- Cutting mat
- 2 Jewelry pliers
- Jump rings
- Necklace chain
- X-actor knife
- Piece of leather
- Glue
- Wire
Steps:
1. Measure 3×8 inches on your leather and cut it. Lay the leather on the cutting board. Use your knife to create fringes and keep them at least 1/4 inch apart.
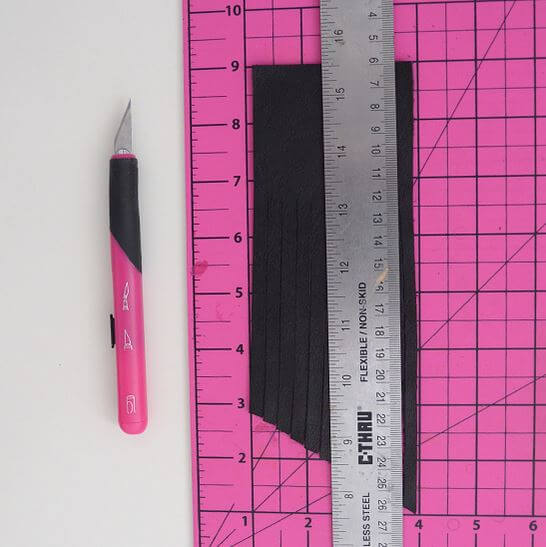
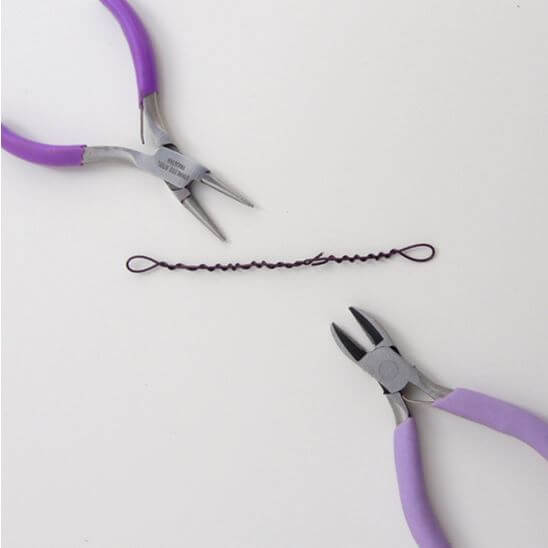
2. Cut about 8 inches of wire. Use the pliers to create a loop at the end and twist some wire towards the middle
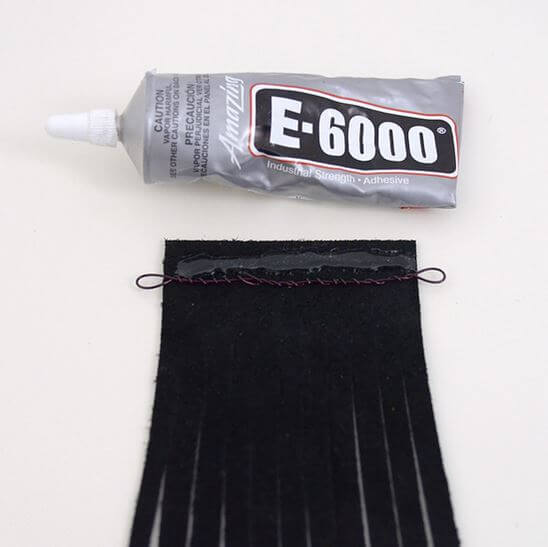
3. Apply glue to the underside of the leather exposing only the loops on both ends
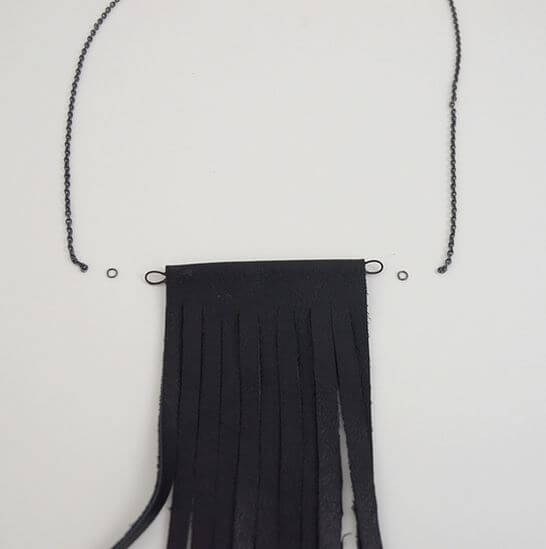
4. Use the jump rings to connect the eye hole into the necklace chain
Thanks to melissaesplin.com
20. Button Necklace Design
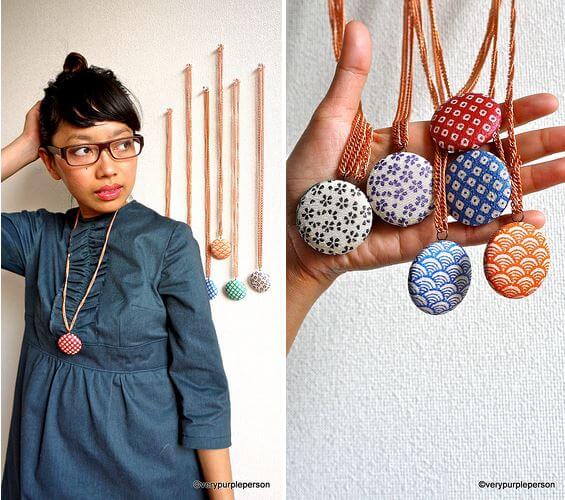
Button necklaces covered in colorful fabrics is a trendy way to show your unique character. It is a simple DIY necklace that looks good with pretty much everything.
Materials:
- A scrap of fabric
- Button kit
- Scissors and marker
- Modpodge
- Small brush
- Silicone glue
- Pendant bail and jump rings
- Chain
- Pliers
Steps:
1. Place the fabric on the kit and cover it with the button
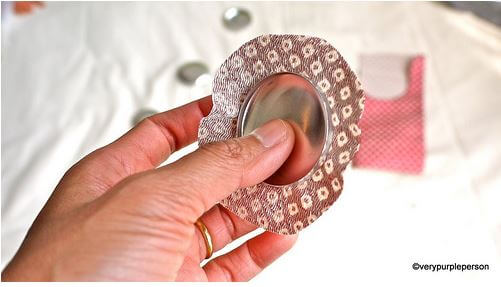
2. Push the button all the way down. Make sure that folds do not overlap
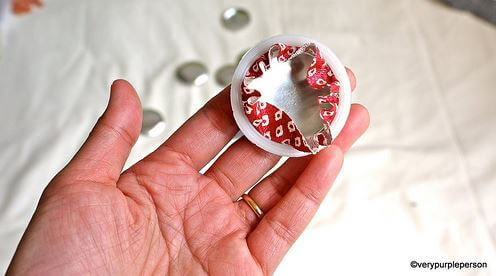
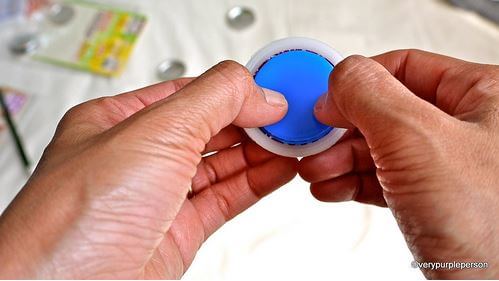
3. Put the back of the button and push until it clicks into its place
4. You now have a fabric-covered button
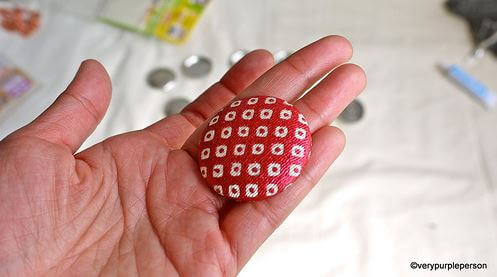
5. Use the pliers to remove the button shank
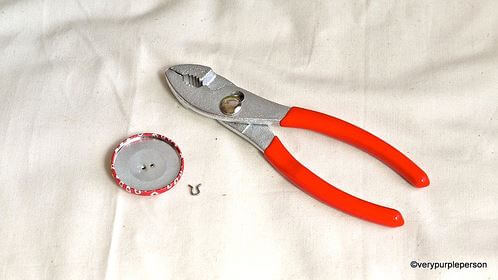
6. Cover the back of the button with podge with the use of a small brush
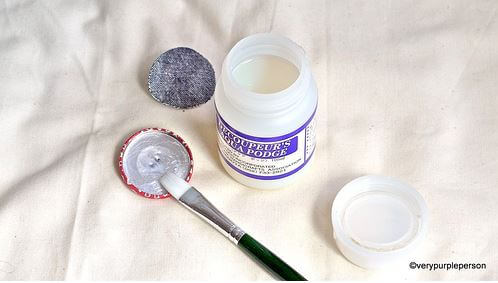
7. Put back the fabric on the button and let it dry
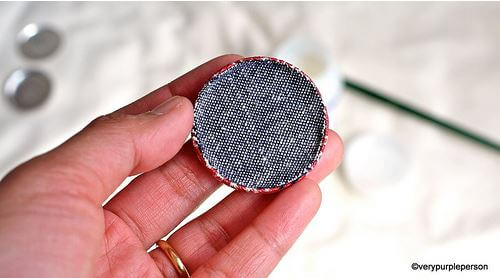
8. Using the glue, place the pendant bail to expose on the loop
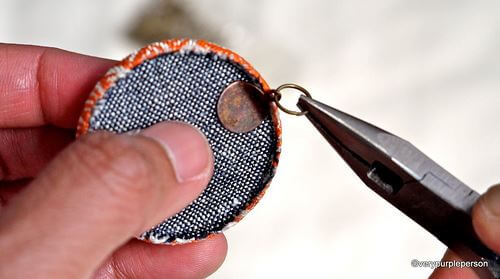
9. Attached the jump ring to the loop and connect it to the chain
