A Bun. Isn’t that the most convenient hairstyle ever? You wrap your hair, no matter how long or short it is, and make a cute little bun on the back of your head.
Since this is one of the most popular hairstyles ever, there are many variations of it, and some of them are pretty awesome (think of a braided bun with weave). Braided buns are one of those hairstyles that will leave you breathless. And they don’t take much time to make.
The braided bun is an excellent choice for elegant occasions, such as weddings, birthdays, and other sorts of celebrations. Don’t be confused if you see different names for this hairstyle. The braided bun is also called the Dutch braided bun.
We have selected five tutorials and step-by-step guides on making this beautiful hairstyle work for you.
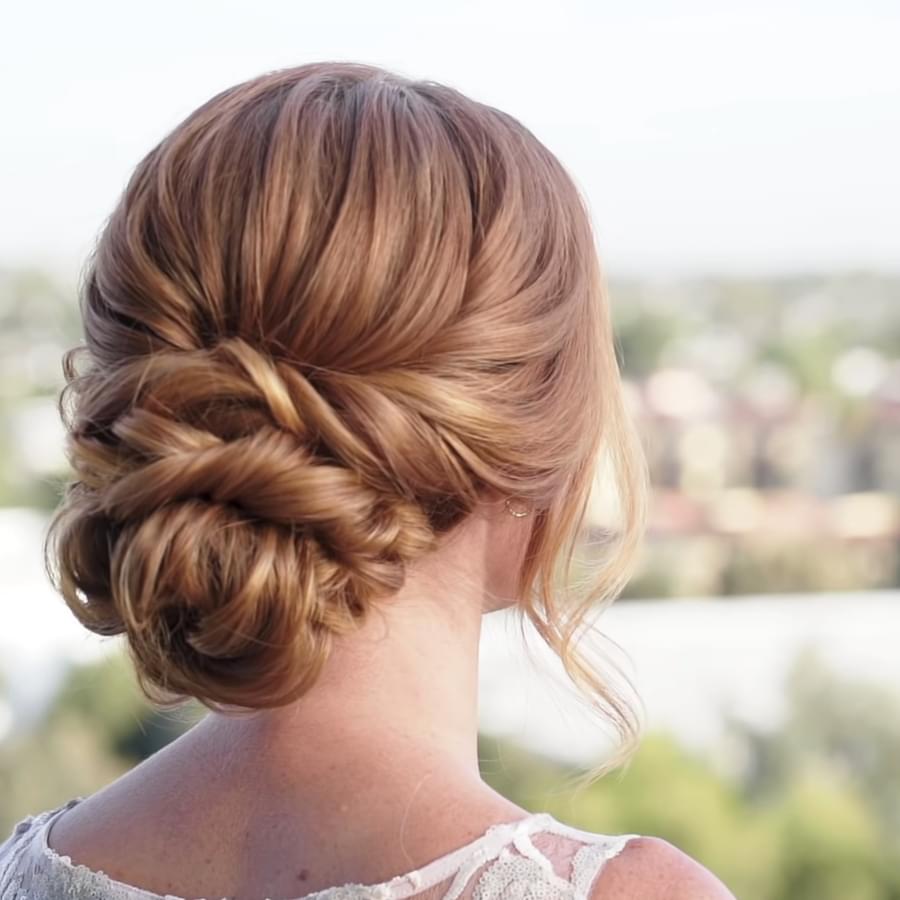
This is How to Do Textured Low Braided Buns
This hairstyle is great for special occasions. The hairdresser in the video suggests it for both brides and bridesmaids at the wedding. It looks textured, so you should prepare your hair before doing this hairstyle.
RELATED: 20 Braided Buns for Black Hair for Immediate Inspiration
It would be best if your hair is at least medium or long.
- Begin with sectioning the hair from the ears forward and the crown section. Then, get the rest of your hair at the back and make a low ponytail. Ensure it is positioned at the center of your head and at least an inch from a hairline. Secure everything with an elastic.
- To get more volume, make the sides around the elastic soft. This will help you look more natural and not too tight.
- You should prepare your hair for the bun using volume and texture sprays to look natural and perfectly textured. When you finish, comb the ponytail with your fingers and twist.
- You can first work with the top half of your ponytail first and then with the bottom one. It will be easier to create a bun that way. Twist the hair and then pull some of the sections to soften them a bit. Wrap it around the top part where the elastic is and secure everything with bobby pins. Repeat with the bottom part and lose the bun so it looks bigger.
- Once the bun is done, you can work on the crown section of your hair. Brush it to eliminate the frizz.
- Start by twisting it low and loose to connect it with the bun. Pull the twist out to give it some volume. Wrap it around the bun and secure it with bobby pins.
- Finish off this hairstyle by twisting the parts of the hair from ears forward and wrapping them around the bun as well.
Elegant Braided Bun
This hairstyle looks pretty, fancy, and elegant. Most importantly, it is easy to make at home without spending money on a hairdresser. You can also do it when your hair is a bit dirty, so you can start with dry shampoo.
- Start by sectioning the crown section of your hair and use a volume spray. Spray it, then tease it, and use a spray bottle to form a tease. Do one big and one small section of this.
- Flip it back again and comb it a bit. Grab the section and tie it with the elastic. Pull out the sides to make it look more voluminous.
- Flip the ponytail to the middle of the updo and make a Topsy tail. Pull the hair out again to make it look softer and voluminous.
- Continue with sectioning by leaving the two front out and take two pieces of your hair just under the ponytail. Bring it to the left side, tie it with the elastic, and make it voluminous, just like the other sections.
- Now, repeat all these steps to the right side – tie, create a Topsy tail, and pull the sides for volume.
- Leave a two-inch section out of your face and clip it off so it doesn’t bother you. You will need a section right behind that and do a Dutch braid. After you have finished the braid, make it look a bit deconstructed and voluminous. It will stay flat on your head when you are done.
- Grab the hair that is left behind your ears and tie it all together in a ponytail. Then tie the ponytail again to the very bottom, leaving just two to three inches of your hair.
- Roll the ponytail and create a loop bun. Secure everything with bobby pins. You can make your braided bun rounder by pulling out the edges and securing it with bobby pins.
- Take the front strands of the hair that are not braided and wrap them gently around the bun.
- Lastly, take the braid and place it loosely over the bun. Wrap the edges around the bun and secure them with pins.
Voluminous Braided Bun
Some women like their hair to look voluminous. This hairstyle of braided buns will make everyone look at you. Big and voluminous braids around the bun will blow off everyone around you.
- Start by sectioning the crown area of your hair. Tie it up in a bun so it doesn’t bother you.
- Push the hair to one side, take a section of your hair, and start braiding a Dutch braid. By adding more and more hair, braid it around the head until you reach the ear again. You can tug on a braid to make it appear a bit bigger.
- When you reach your other ear, continue adding hair and braid around the crown section you have made before.
- Place the end of a braid around your head, tuck it in, or secure it with bobby pins.
- You can now work on creating a bun. Make a ponytail and add a donut bun. You should tuck and wrap the hair around it. If you wish, you can even curl the ponytail to make it more voluminous.
- Finally, you can pull off some strands to make your bun voluminous and puffy. Make sure to hide the donut bun if you have used it.
High Bun and Fishtail Braid
This hairstyle is perfect for elegant occasions, weddings, birthday parties, etc. It might appear a bit more complicated because of a fishtail braid, but we got your back. This is how you can do it step by step.
RELATED: 10 Impressive Braided Bun Styles for Black Hair from Instagram
- Begin by parting your hair on the right side. You can add some hair extensions to make your braid more voluminous and colorful.
- Start braiding your fishtail braid. Divide the hair into two sections and cross the sections to the left and right. Pick up some new hair and cross it to the left side as well. Continue braiding and adding new sections of hair.
- Once you have run out the hair around your ear, stop adding more hair and finish off the braid. Secure it with a bobby pin.
- Brush the rest of your hair into a high ponytail. Take a braid as well and start forming a bun. Wrap the bun with an elastic band. Pull the bun to make it bigger.
- Twist the ends of your hair that are left from the bun and wrap them around the base.
Easy Braided Bun Tutorial
You thought braided buns were only for elegant occasions? Think twice because this is one of those braided bun styles that will assure you otherwise. It is a super simple everyday braided bun tutorial that you will undoubtedly love. This hairstyle is great for work, casual wear, and even for training.
- Begin with finger combing your hair and making two even sides of it.
- Use a small section of your hair, divide it into three small parts, and begin braiding a Dutch lace braid. Braid by adding hair from the bottom center and braid until you reach the middle of the back of your head.
- Finish off the braid regularly. Secure it with an elastic and repeat the same on the other side.
- Cross the braids at the back of your head and wrap the braids around each other. Gradually add bobby pins so everything is kept in place. When you reach the end of a braid, tuck it into a bun.
- Finish off by curling a few strands of hair around your face and pull out braids to make them look voluminous and chunky.